This tutorial is dated, if you are considering a CNC for your personal use, we would highly recommend
purchasing a kit that is very stable from our wide range of machines available. Instead of using allthread for the lead screw and a standard nut, consider using
a 5 start lead screw and anti-backlash nut. It will keep you from pulling out your hair by running much smoother and faster.
Lead screws... hmmm... ok, let's talk concepts. The lead screw is the main component for the transmission of power in a linear form. Yes, a little like the transmission in the car, but much simpler. The screw yields a ratio of force to the linear motion, but conversely affects the speed and resolution of linear motion. To explain in more simpler terms, take a regular screw, and a nut. Hold the nut in one hand but don't turn it. Hold the screw in the other hand and screw it in the nut. Your hand is applying a force to the screw in a circular motion, hence the motor turning the shaft, and if the screw is turning at a stationary point in space, it will pull the nut toward the hand turning the screw. If the turning motion of the screw is reversed, the nut is pushed away from the hand turning the screw.
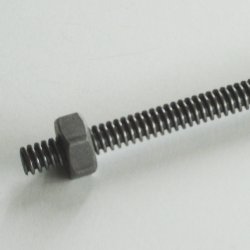
Now let's talk about the type of screw. The types are categorized as: mechanical type, major diameter, thread pitch and material. The mechanical types are typically common screw threads (second image), acme (first image), and ball screw. In this video, I'm using the common screw thread which are cheap and mechanically abysmal. It works fine for me, however. Later I will get into video tutorials regarding the other two types. To briefly describe the other two, the ACME screw is a screw, usually oil dipped steel, with higher precision but still exhibits backlash. The ballscrew is the most precise of them all since all of the threads glide on little metal balls within the nut allow no play, that spins with little effort or friction. Sorry... I didn't explain backlash. Backlash is the brief absence of linear movement when the motor starts turning the reverse direction. This happens because there is a bit of space between the thread of the lead screw, and the inner thread of the nut. To understand what the heck I'm talking about, take a screw and screw a nut onto it. Wiggle it a little bit and you will notice some play. Software can sometimes compensate for this, but it's better to have no play in the mechanism. Unfortunately, the higher the precision, the higher the price. Determine your application and design appropriately. I would use ballscrews for very high precise fabrication. Later, after this video series, I am going to attempt a homemade ballscrew using skate bearings. Now your thinkin'... this guy is off his rocker! We'll see.
Back to the other specifications: The major diameter is measured to the outside of the thread. I am using 1/4". The pitch is the measurement from the center of one thread to the center of the next thread. In addition, pitch is also stated as pitch count which is the number of threads that fit between one inch. The pitch is the most important when it comes to the speed and resolution of the CNC. Speed is an important factor which will be explained later in much more detail. Specifically, the pitch is one of the characteristics that affect the feed rate (velocity) at which the router will travel along an axis. Too slow and you can melt materials and gum-up the bit, too fast and you will put too much strain on the bit yielding a failure (yes, I know, there are other factors such as the router motor and router speed). If the pitch is too high, then resolution will be reduced. Resolution may be important to the application of the CNC, whether you will be using it for PCB routing, or cutting larger components. Other components, which will be discussed later regarding controllers, motors and software will also have an impact on the speed, not to mention the router specifications. Yeah, and you though building a CNC was a piece of cake. It is.. he he. but it dies have a bit of a learning curve.
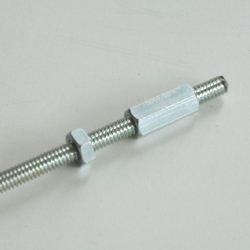
In the video I'm taking my cheapo 1/4" threaded rod, bought from the local hardware store, and inserting it through the holes that I made during the z-axis transmission nut process. First, I send the rod through the top hole and add a few components, a bearing and two nuts to secure the screw assembly in place. Actually, I ended up doing it differently as shown in the image, but there are a thousand ways to skin a cat. I finally chose to only secure it at the top, since gravity is on my side and I had very little friction with the poor workmanship of the z-axis. Additionally, I fastened a nut on both sides of the bearing to secure the screw in place held by the free spinning bearing. In the image, you will note the complete and utter disregard to quality workmanship, but I guarantee it will work like a charm. I don't even have an aesthetic choice on the choice of hardware, screws and bolts used interchangeably. Where you see a bit of screw sticking out, a coupler will be placed to couple the motor to the screw assembly. The bearing is sticking out of the wood very uncomfortably. I may at a later date drill a 7/8" hole partly through the wood so the bearing can be countersunk a little. This also help with the mounting of the motor later. Admittedly, the 1/4" threaded rod had some play within the inside diameter of the bearing, which is about 5/16". A spacer can be used to compensate, or just take some thin pipe thread tape and wind it around the rod until the bearing fits tightly onto it. Check out the fibers of MDF on the bearing (yes, that is what you are breathing).
The video also gets into the cutting of the x-axis aluminum angles, I call em' rails sometimes. It is a very straightforward process. Just measure the board length, in my case I'm using a 24" x 48" board so I cut the angles as a little less than 48" (about 47 7/8"). If it is cut longer, the two stands will get in the way. Oh, by the way, I'm cutting two angles at this length, one for each side, if you didn't already know.