[ Log In ]
[ Register ]
Plasma Sense with the fiber optic cable, ribbon cable and connector to the pokeys57CNC
Price Options Your Cart
PlasmaSense THC
$145.67

Includes free technical support.Learn More
Introduction:

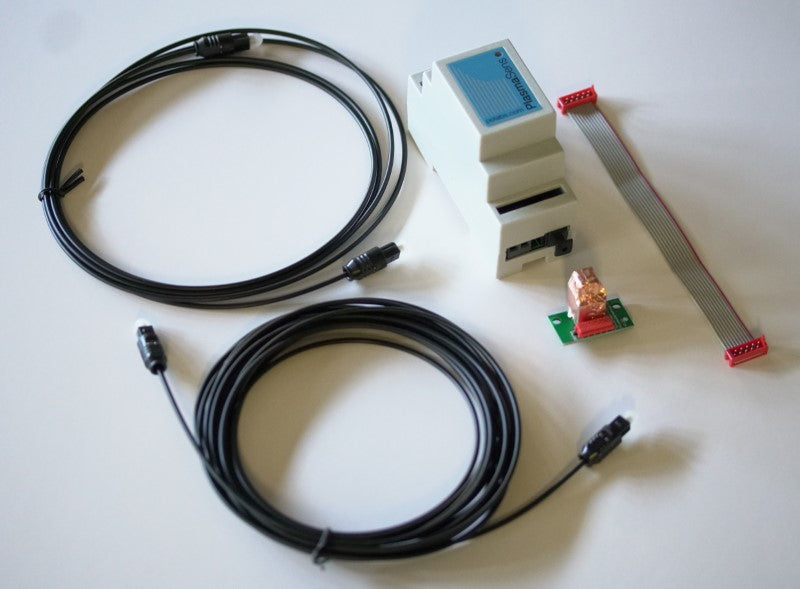
Control the height of your plasma CNC cutter with a Torch Height Controller (THC) that provides the most optimized arc for cutting. This is the PlasmaSense Sensor that connects directly to Mach3 or Mach4

Description:

This is a device that manages the optimum arc while the CNC passes the plasma along the cutting surface of the material. Since material like steel may contain warping and other inconsistencies, the plasma gun needs to be at the right height from the material to have the optimum cutting effect.

This THC solves a lot of problems that may be present in the use of plasma cutting,such as electrical noise. The THC here uses an optical cable that has no electrical characteristics so that the communication from the controller to the THC is clean.

It is recommended that this THC be paired with the Pokeys57CNC controller.https://www.buildyourcnc.com/item/electronicsAndMotors-electronic-component-breakout-Mach4-mach3-USB-ethernet-Board

Included with this package:The PlasmaSense which is directly connected to the plasma machine and communicates back to the Mach3 or Mach4.Two optical cables, one at 2 meters in length and the other at 5 meters in length.

The components are daisy-chained as follows: Plasma Cutter --> PlasmaSens THC --> Fiber Optic Cable --> PlasmaSensInterface --> Ribbon Cable --> PoKeys57CNC controller.

My highly rated Amazon pick for a Plasma Torch:PRIMEWELD CUT60 60Amp Non-Touch Pilot Arc PT60 Torch Plasma Cutter 110V/220V Dual Voltage 3 Year Warranty. I may receive a small commission if you purchase from this link.

Ask a question about the Plasma Sense THC (Torch Height Controller):
Previously answered questions:

Click on the question to reveal the answer.
--
Related Tutorials
Step 20: Stepper Driver Part 1 - Resistors
This tutorial is dated, if you are considering a CNC for your personal use, we would highly recommend purchasing a kit that is very stable from our wide range of machines available. Well... here we are, finally getting started with the electronics portion of the video series. The entire structure of the CNC machine is complete with the exception of the router mount. We will get to that a little later. For now, we will start on the assembly of the HobbyCNC 3 axis chopper unipolar stepper driver.
Thumbnail: USB Controller wired to one driver and one stepper motor Wiring the CNC Motion Electronics with the USB Interface
Here is a tutorial on connecting drivers and stepping motors to the USB Interface for CNC machines. We offer the USB interface/controller for those that have a laptop, or don't have a parallel port on their computer, and who prefer to use the Planet-CNC software. Here I show a video on the entire process to get your USB Interface connected to the stepper drivers and stepper motors correctly and in a simple and trouble free way.
CNC Electronics Tutorial Image CNC Electronics and Wiring
This tutorial will make you an expert in wiring CNC electronics using a parallel breakout board and standard stepping motors and stepping motor drivers.
--
Get Help with:
This Product
Orders
Tech Support
Sales
This Product
Order Query
Tech Support
Sales
Not logged in. Log In Register
Track Order(s)
View Order(s)
I Want to Schecule a One-On-One Paid Tech Support Session
Book an Appointment Pertaining to a BuildYourCNC Product (Free)
Ask a Quesion Below (Free):
Book an Appointment Pertaining Other Equipment ($60/half hour)
Book an Immedite Appointment Pertaining Other Equipment ($120/half hour)
Ask a Quesion Below (Free):
Waiting for response... I may not answer immediately, but I was notified on my cellular phone so my response is forthcoming. If I don't respond immediately, you can always go to the [My Account] page to see all of our chats at any time.