


BuildYourCNC
CNC Machine Hardware and Plans
CNC Machine Hardware and Plans
Couldn't load pickup availability
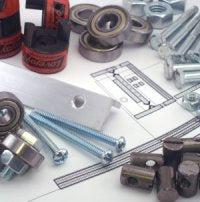
These items are offered to minimize the effort to purchase all of the hard to find components and the many types of fasteners. Plans and Assembly DVD Screws:
Items not Included:
Other items that you will need to completely construct this CNC machine and make it work:
Share


Questions & Answers
Have a Question?
-
Do you have a CNC machine plan available for a 4'x8' machine?
All of our machines that are offered as a kit do not have a plans option. We do have a machine that is build form plans. The plans refer to the scratch build machine: http://www.buildyourcnc.com/cnckitintro.aspx and the one in the book "Build Your Own CNC Machine": http://www.buildyourcnc.com/Book.aspx
-
I have the 2.2KW VFD. I would like to have it controlled through software. What are the Mode parameters that need to be changed that will allow FWD/ REV, START/STOP and RPM control?
What controller are you using to control the cnc machine (Mach3 usb, parallel breakout board, etc.)? The spindle VFD has an input for 0-10 volts to control the speed and can be used with the MAch3 USB or the Pokeys57CNC board. There are also other terminals in the VFD to control the forwared/reverse and start and stop. Mach3 has parameters to control these output and you need to specify which pins are used for these. You can also use the TX/RX RS-485 connection on the VFD to have total control using an FTDI USB to serial connector board to connect the computer directly to the VFD. How to connect the USB to Serial adapter to the VFD: https://www.buildyourcnc.com/FAQ/13790 FTDI USB to Serial: https://www.buildyourcnc.com/item/Interfaces-newbiehack-Interfaces-TTL232R-USB-UART-Serial Pokeys57CNC board: https://www.buildyourcnc.com/item/electronicsAndMotors-electronic-component-breakout-Mach4-mach3-USB-ethernet-Board Mach3 USB board: https://www.buildyourcnc.com/item/electronicsAndMotors-electronic-component-breakout-Mach3-USB-Board Parallel Breakout board: https://www.buildyourcnc.com/item/electronicsAndMotors-parallel-breakout-relay Additional Information: I do apologize for leaving out the parts list. Leadshine MX4660 4-Axis Digital Stepper Motor Driver Ethernet SmoothStepper YL600-2S-2K20 VFD 4 Relay control board Has anyone had any success getting Mach3 to control the spindle speed and direction?
-
how much static and dynamic load can the Linear Ball Bearing Block 20mm take?
The dynamic load ratings for our 20mm linear round rail blocks are 880 kgf . The static load rating is 1370 kgf. Additional Information:
-
IF ORDER 'COMBO #1 (PLANS WITH DVD)', WHAT PLANS DO GET?
You get the plans for this machine: http://www.buildyourcnc.com/cnckitintro.aspx Additional Information:
-
if i purchase the 4 Axis Electronic Combos and the Combo #1 with hardware, plans and DVD what else do i need to have a complete cnc machine
Other items you will need if you are purchasing the electronic combo (motors, drivers, power supply and computer interface) and the hardware and plans kit: You will need the wood to create the structure of the machine. You will need a router to serve as the cutting instrument. You will need a computer to control the machine and the software that will serve as the control program. You will also need lead screws and rails (aluminum angles). If you intend to have faster travel than 20 ipm, we recommend purchasing the 5 start lead screws so you can achieve up to 300 ipm. https://www.buildyourcnc.com/item/mechanical-leadscrews-leadnuts-!5-5-starts-10-tpi
-
If i can get the autocadd drawings of the building mdf peices that need to be build are the plans detailed enough for me to make my own autocadd drawings? I have access to another machine to build my own.
Yes, the plans are detailed sufficiently enough to produce CAD drawings. If you wish to create AutoCAD drawings from the plans that we provide, we ask that the information conform to the creative commons license established on this site.
-
I was wondering what thickness of material the 'book' design can handle on the z-axis?
The book CNC build has a restricted Z-Axis travel due to the design of the Z axis assembly. This machine is best used for sheet material. You can modify the bed of the machine so that there is a depressed area that thicker stock can be placed. The travel of the book CNC build is approximately 5 inches. Increasing the dimension of the gantry from rail to rail will allow a longer z-axis assembly increasing the z-axis travel.
-
I Want to design and build my own CNC wood working machine. Do you give advice and help advice to do this?
We offer as much information as possible about the design and building of CNC machines through this website and the forums at buildyourtools.com. We also still offer our "scratch build" plans at https://buildyourcnc.com/item/cnc-machine-scratchbuild, where you can order the plans and DVD to build your own machine with or without the necessary hardware components. Our technical support staff are occupied full time assisting customers who have bought complete kits or assembled machines, and unfortunately do not have the resources to provide one-on-one advice to individuals.
-
i recently bought your book,trying to find pages refered to for building my own cnc
You can find the web pages that refer to the book at this url: https://buildyourcnc.com/Book.aspx
-
I read the book and i want the vedios show assembly the CNC Machines please give me alink for vedios
The instructions for assembly are found in the book. If you are interested in purchasing the plans and instructional DVD please see this link https://buildyourcnc.com/cnckitintro.aspx
-
I have the BYO CNC book. Any dxf or cad files available?
For our BYCNC book, we have a pdf file with all the parts you will need to fabricate here: (https://buildyourcnc.com/Documents/CNC%20Kit%201-1.pdf), however some modifications and updates have been made, which you can purchase the new files and DVD here: (https://buildyourcnc.com/cnckitintro.aspx). We do not have any .dxf files available for any machines we currently sell.
-
I have the build your own CNC kit 3 Axis CNC Machine 2008, were can I get the Gcode or vector files for it ? I wanted to have it laser cut
Gcode or digital files are not available for our machines. Additional Information: Additional Information: Additional Information: Additional Information:
-
I have the book which has the plans. Are there cad files?
There is currently no CAD files available with any CNC machines that we currently have on the market. However for our BYCNC book, we have a pdf file with all the parts you will need to fabricate here: (https://buildyourcnc.com/Documents/CNC%20Kit%201-1.pdf), however some modifications and updates have been made, which you can purchase the new files and DVD here: (https://buildyourcnc.com/cnckitintro.aspx).
-
I have the book and I am not able to find on the website, the link to download the spreadsheet that has the parts cut list. I also cannot find the link to the construction videos.
Thanks for the interest in the book. The can find the book supplemental videos and information here: https://www.buildyourcnc.com/Book.aspx
-
I have a cnc router that was built from the book "Build your own cnc machine" by james kelley and patrick hood daniel.all the parts were purchased from your company.I have no clue how to work the machine and I need to purchase a spindle (or router) bits , softwear ect , I did mention I don't know how to use the machine !!! Thanks for your help Richard
That is a very loaded question that could be replied in so many ways. I will need a more specific question to help you. For instance, I have my machine moving in different directions, but I don't know how to make the machine move according to g-code instructions. Another question could be, I connected all of my electronics and the motors are not moving and I did all of the steps on the electronics video to troubleshoot the problem.
-
I bought Kindle version of DIY CNC book; pictures are illegible. I can't find a place to download actual PDF plans on site. Can you please provide a link? Thanks
You can see the component list on the hardware and plans machine (scratch build machine) since it is the same machine in the book: https://www.buildyourcnc.com/Item/cnc-machine-scratchbuild Additional Information: Additional Information: Your book claims that plans are available for download, not purchase; the "plans" included in book are illegible and sometimes dimensions omitted - e.g. Fig 3.6 is cutout plan but dimensions are missing from dimension arrows. Your call to provide or not provide plans on the website but should not claim to if you will not. I'll hold my putting review on Amazon until I hear back from you. All I'm asking for is legible dimensions - PDF format will work but I'll ANY legible format. Thanks for your consideration. Additional Information: A PDF version of the plans are available here: https://www.buildyourcnc.com/Book.aspx
-
I am wondering if you also supply plans for the bigger machines, also the vertical CNC that you have in your product range?
The only plans we sell for any machine, are the ones that relate to the book we create found here, http://www.buildyourcnc.com/Book.aspx Here is the link to those plans that we sell, http://www.buildyourcnc.com/cnckitintro.aspx We do not sell any other plans, only full kits, with or without electronics.
-
I am looking for the dimensions for drilling from the plans in the book
Dealing with the dimensions of our scratch build kit, you can find the design and dimensions here (https://www.buildyourcnc.com/Documents/CNC%20Kit%201-1.pdf). You can go to the main CNC book page here (https://www.buildyourcnc.com/Book.aspx).
-
I am looking at yur hardware kit, plans and dvd, which electronics kit matches these plans and what else do I need to complete this project. Thank you
The standard electronics combo with 3 NEMA 24 motors is suitable for the scratch build machine. In addition to electronics you will need a computer, software, and a router or spindle.
-
I am building the machine frome the book. The measurements for the 6 screws that hold the table together are missing. The chapter seven addisional material on the your website has the measurements but they are unreadable. Can you send me a PDF of that sheet. The cnckit1-1.pdf file on your website also is missing the measurements. Thanks Joe
If the pdf. files cannot be viewed please update your pdf. reader, also for the X Table End, There are two of these table ends on the machine, each an exact mirror of the other. You will need six (1/4") 2" screws to fasten this to the two table halves. The two holes on either side of the bearing seat require 3" screws to fasten the motor mounts. For specific requests with needed files (please state email address or email customerservice@buildyourcnc.com)
-
How do I get started I would like to build a cnc router. Making the machine I can do, but I am weak on cad,cam and mach3. I am thinking about a 4�x4�. Do you have plans I can buy?
We are developing plans for our machine, but they are not completed yet. Please let me know if you would like to be added to our list of customers wanting plans. Thanks, Additional Information: If you have specific questions regarding CAD, CAM and Control, please add another question to the customer service and I will answer them in detail.
-
Hi, is it possible to buy only plans. I live in Europe and it gets quite pricy with shipping costs.
Plans are not sold at this time. If you are interested in getting a machine in Europe we have some options for you. Please email sales@buildyourcnc.com for more details.
-
Hi The larger Laser kit mentioned ready mid 2015 have you spec and price yet. Looked on ResDev page and could not find? Thank
The larger laser kit is still in development. We have not confirmed a BOM, not found the best suppliers. The release is still on track for mid 2015, however. As you know our prices are the lowest in the industry for what the kits can do, you can expect this machine to be in-line with this. Additional Information: Additional Information:
-
Hi Patrick back in 2013 I purchased the cnc hardware and plans kit. I misplaced the dvd which shows you how to configure the mach 3 software to the cnc machine I build. I it possible to get another dvd. Or do you have the information somewhere you the website or youtube?
I will find this answer when I get into the office on Monday, but I have no problem sending out a replacement DVD out to you. If you would like to do this, please call us on Monday and let us know that you need a replacement DVD
-
Has anyone built the machine from the book plans and made changes to the Gantry to allow an increase in the Z-axis travel. If so, what dimensional changes need to be made besides increasing the height of the Z-axis pieces? I would imagine the gantry rail and sides have to be altered as well. Am i missing anything?
If the gantry height is changed by, say 3 inches, then the z-axis front, rails and back (where the nut is mounted) needs to increase by 3 inches.
-
For your USB breakout board, do you guys have, or have a source for a connector that fits over the "keyboard jog" pins?
At the current moment, we do not have a connector/attachment for the keyboard jog pins on our USB Breakout board. We are currently under development of a keyboard jog panel, that will connect to the keyboard jog pins. Additional Information: Additional Information: Additional Information:
-
for 2" Strip Brush per inch what is the dimensions (Width, High and thickness)
The strip brush overall height is 2 inches, of which 3/16 inch is backing. The strip is 1/4 inch wide. The diameter of the bristles is 0.01 inch.
-
DOES YOUR COMBO #1 WITH PLANS AND THE DVD COME COMPLETE PARTS LIST?
The parts list is located on this page: http://buildyourcnc.com/cnckitintro.aspx at the bottom of the description. Additional Information: Additional Information:
-
list of materials for build your own cnc
Are you referring to the book build? Additional Information: yes Additional Information: Yes Additional Information: Yes
-
Does the MDF have to be 3/4" or can you use Thinner sheets?
It's best to use 3/4" sheet for the scratch build machines on this site. There needs to be room on the edge of the sheet for an intersecting hole to meet the hole for the cross dowel.
-
do you sell plans for big machine with chain driven and how much its cost as dxf file which i can cut using cnc
The plans or DXF files are not offered. We sell the machines as kits or fully assembled. The kits are very well priced and will most likely cost less if materials and labor than working from plans (this comes from feedback from many customers that built similar machines from plans).
-
Do you offer plans for the blackToe CNC Machine?
The blackToe machine is offered as a kit only. We do have a machine that is build form plans. The plans refer to the scratch build machine: http://www.buildyourcnc.com/cnckitintro.aspx and the one in the book "Build Your Own CNC Machine": http://www.buildyourcnc.com/Book.aspx Additional Information: 20