How to install the LaserCAD Trocen Anywells Laser Cutter Controller and CAD software.
The Software to be installed is called LaserCAD and is the software that allows communication between the computer and the laser cutter controller, but it also allows you to draw geometry, add text and images and download that file to the laser cutter controller.
The software installation is relatively straightforward but when installing the AWC608 Laser Cutter and Engraver controller, the USB connection driver will most likely not work. Fortunately, the Anywells Laser controller uses a standard FTDI USB to serial converter as the main mechanism to communicate between the computer and controller. I found a workaround using this FTDI as a hint to simply use the FTDI drivers directly rather than using the drivers that come with the LaserCAD installation.
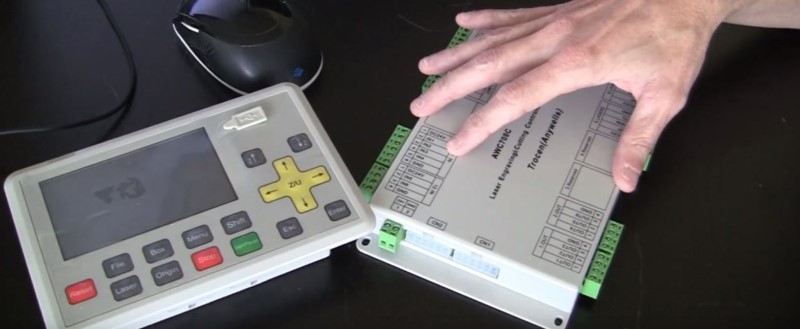
Prerequisites to this tutorial is that you have a laser cutter and engraver controller from Trocen called the Anywells or has a model number that starts with AWC and it is, at minimum, wired for power and the control panel is connected to the main laser controller unit.
So, why is it important to connect the computer with the controller when the LaserCAD software gives the ability to download the cut file to a thumb drive (flash drive or USB stick)? The computer needs to be connected to the Anywells AWC laser controller to set some important parameters that cannot be changed on the laser controller's control panel.
Let's run through the installation process:
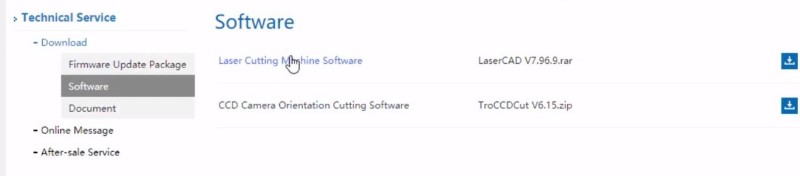
- First, you will need to download the LaserCAD software. The LaserCAD software is the CAD application that allows you to draw geometry, place text and images on a drawing surface. You can also import popular file types such as AI (Adobe Illustrator), CorelDraw, DXF (AutoCAD format), PLT, and many more. This is also the application that you will use to directly communicate with the laser cutter's laser controller. You can get the latest version of LaserCAD at: http://www.sztrocen.com/download/software. On that site, the LaserCAD installation software is compressed with the RAR format which may not be an available extraction type on your computer. If you don't want to download WinZIP to extract the RAR type, then you can download a copy of LaserCAD V8.10.21 on this website at https://www.buildyourcnc.com/item/Laser-Component-Laser-Control-System or just download it here: LaserCAD V8.10.21 download compressed in ZIP format.
- Extract the LaserCAD installation package into a folder that you can find. I typically use the Desktop for this purpose.
- Go into the folder that you extracted the compressed folder into and double-click the setup file. This will start the installation process. If you see strange characters in the setup dialog box, select English in the drop down box to set the language so you will be able to read the installation dialog boxes and set the correct language for LaserCAD.
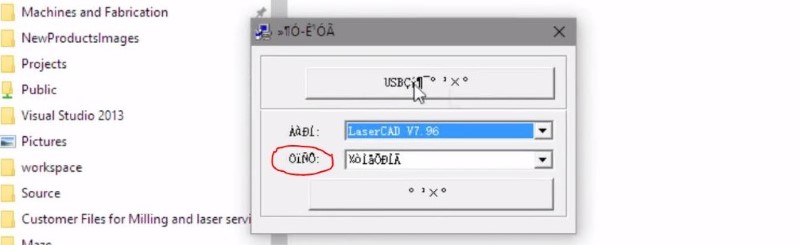

- You will be presented with two main install buttons. One to install the USB Driver and the other button on the bottom of the dialog box to install what is selected in the "Type" dropdown box. The main choice for the type is LaserCAD followed by the version number. Alternatively, you can install the plugins for various programs.
- To test if your computer will work with the installed drivers, you can click on the Install USB Drivers. It will tell you that the FTDI CDM drivers have been installed and then a installation wizard will appear showing you the name of the driver. Press "Next" then "Finish" to complete this setup. This step is going to give you the ability to select that driver for the communications port in the device manager "Ports (COM & LPT)". If this driver doesn't work, I show the steps to download and install the latest FTDI USB drivers.

In case you are wondering, FTDI is a company that develops integrated circuits to enable standard serial communication through the USB port.
- Now, let's install the main program. After you press "Install", a dialog box titled "Select install path" will appear. Select the drive and path that you would like LaserCAD to be installed into and press "OK". I keep the C:\ when I installed this program. The installation is almost instantaneous when the "OK" button is pressed and will say "Install OK!". If you get a message that says Can't Copy files or a message similar to that, then it means that it doesn't want to over-wright the files in the install path, or you are trying to install from the compressed folder. If you want to check to see if the installation was successful, open the file explorer and navigate to the path in the installation steps and take a look inside. You should see a bunch of folders starting with "AWC".
- A new icon will appear on your desktop to conveniently start LaserCAD. You can double-click this icon to test if the program works. The LaserCAD user interface will appear.
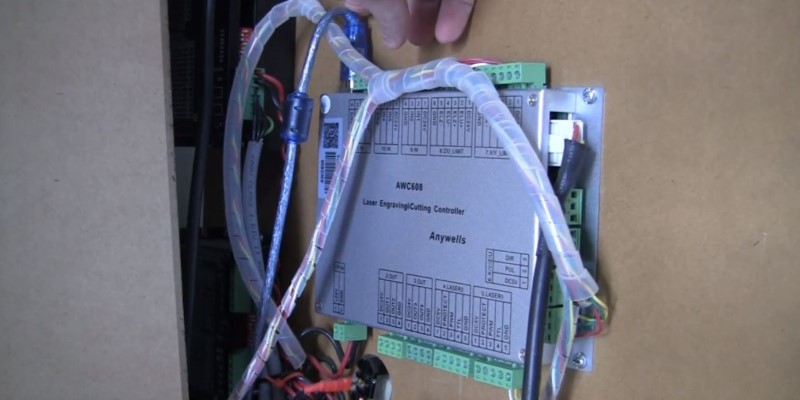
- Now you can connect the Trocen AWC608 or AWC708 laser cutter and engraver controller to the computer using a type B to type A USB cable. In this demonstration, I am connecting to an AWC608 laser cutter controller.
- Turn on the laser cutter and engraver controller. You should see the control panel light up and show you some information. If it says "System Resetting", just press the "Stop" button and the control panel will go to its normal state showing information like power (tube laser intensity) and position.
- Go to the device manager on the computer by right-clicking on the Windows start menu and select "Device Manager". You may notice a line item called "Other Devices" with a sub item having a small yellow triangle. If not, check under the Ports (COM & LPT) line item and check the sub items to see if there is a valid laser controller connection item called either "Trocen..." or "USB Serial...". You can skip to the step where I test if the communications under LaserCAD.
- If you do see the item with a small yellow triangle, it may say "USB Serial Port" or "FT245R..." If this is so, you will need to follow the next steps.

- Let's go to the FTDI website and get the latest drivers. To go there directly, just click this link to be directed to the FTDI drivers webpage: http://www.ftdichip.com/Drivers/D2XX.htm
- You will want to select the driver version in the selection table at the lower portion of this webpage and make sure to select either the 32-bit or 64-bit version corresponding to your computer and Windows installation.
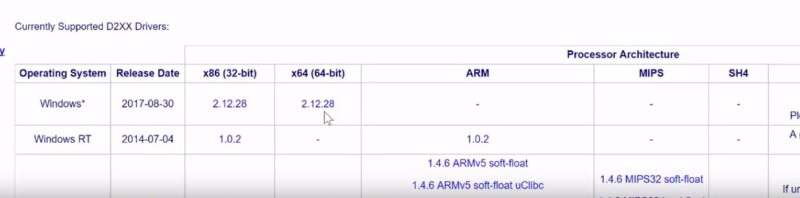
- The download filename will be called something like: CDM v#.##.## WHQL Certified where the # represent the version number. You can extract the files in a location that you will find convenient because you will need to go there in the next step. I extracted the filed into my LaserCAD installation folder under the AWCDrivers folder so I can associate the drivers at a later time if needed.
- Reconnect the laser cutter and engraver controller back into the computer and go back to the Device Manager window and double click the item with the little yellow triangle mentioned in a previous step. Click on the Driver Tab and then click on the "Update Driver" button.
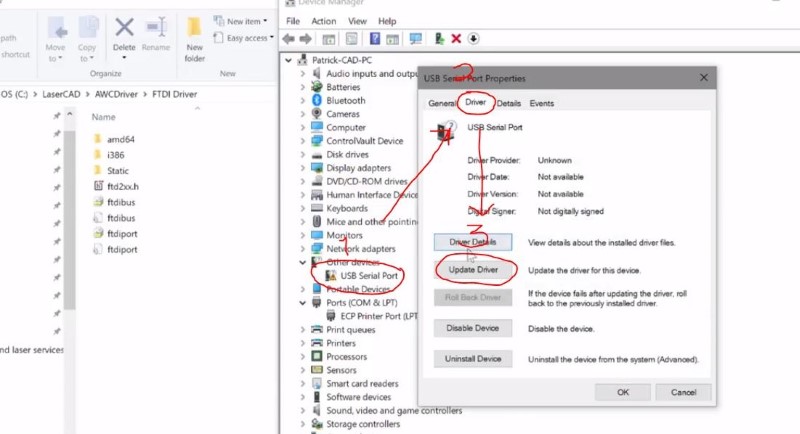
- Next, you want to click on the "Browse my computer for driver software" and then click the "Browse" button and navigate to where you elected to extract the FTDI drivers. When you select the folder that the driver is in, the Update Driver wizard should show a screen that says "Windows has successfully updated your drivers". Go ahead and close the wizard and exit the driver dialog box and in the Device Manager window, you should see a new item appear under the "Ports (COM & LPT)" line item called USB Serial Port (COM#). The number replacing the # is important and you will need that number to inform LaserCAD what port is used for the laser cutter controller connection.
- Start LaserCAD by double-clicking on the LaserCAD icon on the desktop and then clicking on "Select Mode" button at the top right of the LaserCAD user interface. A dialog box will appear allowing you to select USB Mode or Network Mode. Make sure USB mode is selected and double-click on the port item under USB mode (probably called MachName with a number) and click on FindCom button and LaserCAD may change the number in the USB COM textbox. If not, insert the COM number that you noted in the last step. If it says "Communicating Unsuccessful!", then repeat the previous steps and make sure the cable is securely plugged into the computer and the AWC laser cutter controller.
